Burlesque Beginners Dos and Donts

Aug16th2015-13

I’ve finally begun performing burlesque, and it’s been super hard work and a hell of a lot of fun. It’s had me somewhat creatively distracted for a while too, so it’s about time I check in with you guys here to teach you something new, in my usual by beginners for beginners format, with the help of my new partner Riley Strange!

So you’re intrigued by burlesque and you’ve never done it before, so you want to give it a shot. To go to shows and see the finished product on stage can feel pretty overwhelming when you have plans to try it out yourself. Just how does it all come together? If you don’t have a mentor to guide you you might be totally lost. Let us lay down a few simple dos and donts to get you started.

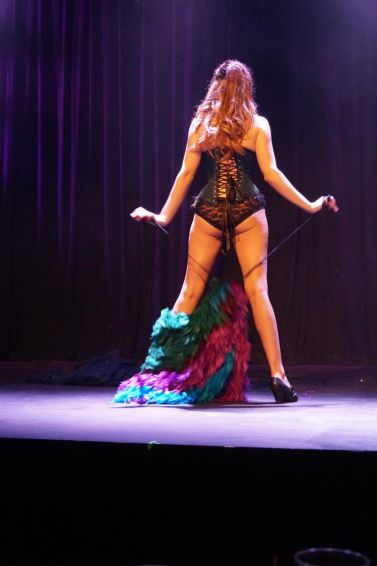
Riley prepared to go on stage for her Alice in Wonderland routine

Do…

-Your research. Learn by taking a class if there are any in your area, watching youtube videos, going to shows, reading up on burlesque history, and perusing informative websites such as 21stcenturyburlesque.com. Jo Weldon also has an awesome book on the subject that covers way more than I can here in a puny little blog article.

-Cut the damn tags off your clothes. As a performer you are delivering a fantasy. Tags and other flaws like stains, wrinkles and tears take the audience out of the moment.

-Be creative with your costume. Even if you must wear something off-the-rack, try to alter it in some way to make it one-of-a-kind. The last thing you want is someone in the audience pointing and going “Hey, I have that same bra at home!”

Adding rhinestones to these Victoria’s Secret panties add a little special sparkle

-Choose a song you absolutely love. With rehearsals you’ll have to listen to it a hundred times, so if you don’t love it, it’s going to be a nightmare to perform to once show day arrives.

-Be aware of what your audience will enjoy while not compromising your own tastes.

-Go big or go home. This is not a movie or a photoshoot, and there are no close-ups. Makeup and movements need to be seen from the back row. You WILL feel silly, at least in the beginning. You’ll get used to it.

-Make sure your stage name isn’t already taken by somebody else. A Google search should be pretty much all you need here.

-Make the most of your abilities. Any abilities. Dancing, acting, costuming, comedy, acrobatics, the list is endless.

-Be prepared for people to have misconceptions. Don’t get offended, it’s part of the deal. It’s up to you if you want to work towards changing their mind or not.

-Try to find a mentor if you can, to guide you through this stuff or just keep you company while you’re gluing on rhinestones.

-Consider the length and pacing of your song. You don’t want to feel rushed, or end up with nothing to do because the song was too long or slow.

-Be reliable and professional. This might be a fun job, but it is a job. It deserves to be taken seriously.

-Come to your show prepared. Remember not only the elements of your costume but makeup, pastie tape, a Tide stick, etc. This is the huge packing list Riley and I had last time we did a show, and this is only for three acts between us.

All this shit for less than 15 minutes total stage time. Also handy to make sure you leave nothing behind at the venue at the end of the night.

-Plan something achievable. This is something me and Riley have personal experience with. We kept coming up with extremely ambitious routines that were just way above our level. If you keep doing that you’ll never be able to complete the process to see it come to life on stage. You can keep having ambitious ideas, just tuck them away for a future date. A routine does not have to be difficult in order to be entertaining.

April 1 2016 - Heart-Shaped Box

Don’t…

-Think that the performances you see are the rules. This is art, there are no rules. You don’t have to wear a corset, you don’t have to choose a jazz song, you don’t have to know how to dance (although it helps) and believe it or not you don’t even have to be sexy. Let this be an expression of who you are, even if it only relates to one of your many facets. Well ok, there is one rule, and that is that you must be entertaining.

-Wear anything flat black unless your character depends on it. It’s too drab and somber. Either add some sparkle and shine or choose something more lively. Or better yet, both.

-Limit yourself. Explore new horizons and keep things fresh.

Just a backstage selfie with Adore Delano. No big deal 😛

-Focus on reasons why you “shouldn’t” do burlesque because it’s just not true. Any adult age, any gender, any body type, and any ability level (there are even burlesque performers who use wheelchairs in their acts) is accepted. This is the real beauty of this art form. It’s about celebrating what makes you you.

-Forget your face in your choreography. It just won’t look good if you look like you’re taking a shit while you get undressed.

-Be a diva. Ok this isn’t just a burlesque tip, this is a life tip. There’s a difference between honestly expressing something that’s important to you and acting like a spoiled child about it. You’re not above anyone.

-Panic if something goes wrong. Because it will, even to seasoned performers. But guess what, the audience probably doesn’t know, and if they do they’ll think highly of you for being able to just move on with the act instead of freezing in a panic. Riley and I have both performed to the wrong track when the DJ made a mistake, and neither time could anyone in the audience tell. Keep in mind we are both still beginners. It happened to Riley on her second day.

-Make excuses! You’ll just keep missing out.

Perfect Headband Curls

So you saw headband curls on Pinterest, thought “ERMEGERD so cool!”, tried it out, and hated the result. Why must everything on Pinterest be so misleading!! Well I know that you can indeed get perfect curls this way, but the other tutorials seem to skip a couple steps. Let me fill in the blanks.

I’m not going to get too deep into the basics because you already know that by now. But let me just say that if your hair is fairly long, or if you have a hard time keeping one side tightly wrapped while you do the other, two headbands, one for each side, is a good solution. So there you are in all your going-to-bed hotness, you sleep on it, wake up, and now we’re ready to begin.


Here’s the front when it’s wrapped, your starting point.

IMG_3413

Realistically, you CAN wear this out of the house.

The back, meanwhile, if you used two headbands, looks like this.

IMG_3364

Ok, so you take the curls out of the headband, and you are immediately disappointed, because it looks like shit.

IMG_3369

The look on your face of course will match this picture as well. This is not what you signed up for! Well it’s at this point that the extra steps come in. First of all, brush it. I know the tutorials all say not to, but fuck that we’re brushing today.

IMG_3376

Then to smooth it out and calm down any frizz, run some mousse through it. So now you got this.

IMG_3382

Ok so now you grab the top layer of each side, hairspray it, and tease it. I like mine to be HUGE.

IMG_3383

I know it’s a little hard to tell the difference between the last two pictures, but trust me that teasing is important. This curling method doesn’t curl your hair at the top, so it can look quite flat compared to the rest. Teasing it helps to even things out, and as far as I’m concerned, big curly hair is the best curly hair.

So just fuss and tinker, and shape the curls by twirling it around in your fingers a bit, you know. I also find a little styler/flat iron thing is great for curling the ends where they got loose from the headband, and calming down any parts that got too curly. I always get one little piece like that in the front. But that’s it! It’s not quite as quick as they lead you to believe, but it’s not bad.


Hey, there we go!

Hey, there we go!

And since we all know that any kind of set can often turn out inconsistent when you’re not a pro, here’s another example of my hair at this stage, from about a month or two ago.

There we go!

A less than perfect job and it still looks good!

And on a particularly good day, with particularly good lighting, you might even be able to make it look like this.

Hellooo profile picture.

Hellooo profile picture.

In the set I’ve included pictures of, it looked its very best after sleeping on it for a night. All you have to do in the morning is brush, add a touch of mousse, and ruffle it a bit.


Perfect

Perfect

When I wrapped it up again that second night and left it dry, to preserve the curls over a few more days, I timed myself at exactly four minutes. This is officially the absolute quickest way I have ever found to curl my hair, as long as you plan about 5-8 hours ahead. Practice this one, tinker and play with it a bit, and you’re sure to find this will be one of your go-tos too 🙂

Pin Curls for Dummies

Pin curls are incredibly difficult to master. We all know this. I’ve been struggling off and on for ages trying to figure it out, and I was determined that as soon as I could manage a successful set, I would write about it here to help all of you who know what I’ve been going through. Don’t give up, it’s so worth it. There’s nothing like a pin curl set to get the most authentic look, the most malleable and cooperative hair, and the most staying power out of your look.

The basics. A pin curl should be wound (or wrapped, more accurately) from tip to root, not the other way around. This way the end gets tucked in and doesn’t stick out all funny. It’s especially important not to twist it or you’ll get the fuzziest incurable afro instead of smooth vintage curls. The basic technique is to take about a one inch section of hair, wrap the end a few times around a finger or two, and then slip it off your finger and wrap up to the scalp and pin with a pin curl clip or a couple bobby pins in an X. I recommend 2 fingers because it’s easier to get the hair off, and you can put the very tip of your hair between the two fingers to pull it into the center where it belongs. This is all fairly straight forward, but it’s extremely challenging to keep that little circle neat and tight as you wrap it, and to keep the ends in, especially if your hair is naturally straight.

What helps – the first thing you can try, which is time consuming but makes a big difference, is pin curl your hair when it’s already curled. If you’re dedicated and have a lot of time, you can set it in hot rollers before setting it in pin curls. But this gets to be a bit much, definitely not something you want to do on a nightly basis. The other way is to do a regular roller set one day, and then set it in pin curls that night. It doesn’t help much for keeping the curls tidy as you wrap them, but it really does help to keep the ends in and get the curls started, since you’re working with a shape that’s already somewhat what you want. Another quick tip – I found that standing pincurls are a little easier to position on your head, easier to clip since there’s less hair to get around, especially if your hair is long like mine, and gives more volume. They’re too small to really crush while you sleep, and if they do at all then the hair at the top will cover it. I managed this with no issues at all. Only one curl got crushed, and once it was all brushed out you couldn’t tell if you tried.

The BIG thing that helped me, I feel the only reason I was able to accomplish this finally, was using a pin curler, or pin curl stick. These are generally uncommon. When I googled it, I found nothing. The only mention I found of them was on the fedora lounge, where girls routinely do pin curl sets and look at old magazines of the vintage era. My grandma had never even heard of one and she’s been doing pin curls for probably over 60 years. Where I first heard about them though was in a Lisa Freemont Street video about pin curling. She had the Sculpture Pincurler from Vintagehair.com, and because she’s never steered me wrong, I got it immediately. The packaging and the product itself are authentic 1950s, totally adorable. It has a different size on each end, honestly not much different, and the ends are comb-like. So you put the tip of your hair through the comb part, roll it up like a curler, turn it on end, and slip your hair off. Brilliant. This made everything VERY easy, and the top and sides of my hair at least turned out perfectly parted and even because you can only use a very specific amount of hair for each curl. It forces you to be uniform, and when everything was pinned up it looked downright professional. Amazing. But I also got to thinking, this is so simple there must be other things you can use. Such as chopsticks, or dolly pins. Or you could use little end papers and something like a marker or lip gloss tube. The possibilities are endless. Do whatever works, it’s totally not cheating.

All set.

All set.

I also just want to mention water really quick before I move on. You can spray it before, or after you set. Which one you do will depend on your hair type, how quickly it dries, and the final look you want, but unlike rollers which you only want damp enough to resemble a fine morning dew, you can sometimes get away with setting it wet. I found that spraying each piece damp/wet before I rolled it resulted in fluffy hair like in the mirror shot I took below with the flower. That next night I set it dry in all standing pin curls and sprayed it after it was all done. Quicker, and it used less water and setting lotion that way. I also found that it resulted in a much smoother curl, like this black and white picture just below here. I didn’t love it when I first brushed it, it looked a little helmet-y. But after a little time to relax and shake it out before brushing it again, it was smooth and loose and luxurious, just like Rita Hayworth. Perfection. I will be doing this from now on. From what I gather, this might be best for longer hair.

So you all must know as well everything I knew about brushing them out – on paper anyway. But there’s something really different about doing this which really makes you deeply appreciate how true it is that brushing your hair out is the most important part. To start, it’s really tough to get the brush through. The curls are just so tight. I mean my hair is 14 inches long (which is to the bra band) and the curls that came out of the pins were seriously about two inches. My hair looked very short. That’s how dense it gets, so brushing is difficult. Then you start to get a big frizzy fro.

I just had to come back to this article and add this picture, to show you that THIS is actually normal. Don't manic. Worst case scenario, brushing doesn't calm it down and you put it in a snood for the day. Put it back up into larger pin curls at night, leave them dry, and the next morning it will be beautiful.

Sorry to interrupt, but I just had to come back to this article and add this picture, to show you that THIS is actually normal. Don’t panic. Worst case scenario, brushing doesn’t calm it down and you put it in a snood for the day. Put it back up into larger pin curls over night, leave them dry, and the next morning it will be beautiful.

See?

See? Ok, I’ll let you get back to the tutorial now.

It gets scary. And you know you have to keep brushing for ages, but it’s not THAT long. Maybe a good 5 minutes. Try not to freak out during that 5 minutes. I knew this would happen and yet I almost did. But as you go, you start to see your hair turn into a shape. The top of your hair WILL smooth out, you won’t get granny hair unless it’s really short, like the midi baby or something. Brush against your hand of course, and brush it in the direction you want it to curl. To get everything uniform, and turn it into pretty much one solid mass of hair, I pulled everything back into a ponytail and brushed around and under my thumb, then made sure the ends were tucked in and gently spread it around to the sides. When my hair started to break up and look a bit messy I just did it again. Just a few seconds to get everything back into place. Now just add a flower and you have yourself some real 40s glam going on.

My first successful pin curl set. Go me!

So this takes a lot of time, many failed attempts at about an hour or so each time. But you’ll get there. It will get better, and faster. Just know that no effort is wasted. I found that even when my hair came out wonky straight, pin curling gave it enough structure to make the ensuing hot roller set last over 12 hours in high humidity. Hot rollers or hot sticks are blessings for a failed set, and everybody gets them. And then when nothing else will do, you simply have a new opportunity to try a cute retro updo. Keep at it!

Here’s that great video from Lisa Freemont Street.

My Bright Hair Routine

No. No no no no no. No.

No. No no no no no. No.

I’ve been dying my own hair for over 11 years now (wow, has it really been that long?) and I’m often asked how I manage to achieve my color. It’s not as simple as buying dye from a box though. To get bright unnatural colors you need to use veggie dyes, and it’s a 2-step process.

So where do I start?

I used to buy box dyes. It seems like the obvious choice. But while looking through the “reds” section, I can’t help but feel like the people who pick the shades need to go back to kindergarten and revisit the color wheel. Dull auburn is not red, guys. It’s little more than a very warm brown. How exactly did you get your jobs again?

So because this color would start out “almost red” and quickly fade to “not at all red”, I would occasionally punch it up with some manic panic. This would be gorgeous for about, oh, four days. The bathroom redecoration on the other hand would last for weeks. Waste of money indeed. So then a very smart and beautiful friend of mine told me to get Punky Color instead. This happened to be around the time the 24 hour drug store down the street started carrying it, so it couldn’t have been more convenient.

Everyone’s hair is different, so you may have to try a few brands to find the best one for you, but on me this is ideal. This shit does NOT fade. After 2 months my color is just slightly more subtle, and in high quality photos is shows up as bright as the day it was done. With my current routine of washing just once a week, it hasn’t noticeably faded at all by the time I need to do my roots.

There is only one issue here, and amusingly enough the beauty consultants at the drug store seem to have no idea about this. Veggie dye does not contain developer, so it doesn’t exactly work on virgin hair. In general it is expected that you will bleach your hair first, so it will be damaged enough to hold the color and have a nice light base so it comes out really bright. I find bleach harsher than I would like, using it makes me nervous, so I start by dying my roots blond. Make a lot of partings in your hair and just slather it in there, making sure to get behind your ears and all around your hair line. When that’s done, I like to scoop up some dye with my fingers and slide them under my hair and rub my head all over with it to make sure I got it everywhere. If this is your first time going bright, you’ll have to lighten the whole thing.

Step 1: doing roots with blond dye.

Step 1: doing roots with blond dye.

Important note: You cannot dye your hair blond if it’s not at least light brown already. Why? Box dyes work by stripping (hence the the developer) your color and depositing their own color in one step. But they don’t contain enough developer to lift your hair more than 2 or so shades. If your hair isn’t light already, just use bleach. Pro tip: Make your blonde dye last longer by mixing a third to half of each bottle from the box in a bowl and save the rest for later, similar to using bleach and mixing dye as explained below.

Step 1 = complete.

Step 1 = complete.

Step 1.5: Dry hair to at least damp in preparation for the veggie dye.

Step 1.5: Dry hair to at least damp in preparation for the veggie dye. And yes, I’m topless. Why ruin a shirt if I don’t have to?

Ooh, like a sunrise!

This is from months ago. It’s like a sunrise!

And now a big secret: Red veggie dyes fade either pink or orange, and most people don’t really want that or they would have dyed it pink or orange in the first place. The best way to avoid either is to mix an orange-red with a pink-red. Yes, you can custom mix with veggie dyes! They cancel each other out and fade gorgeously, to a soft rose red. I used to do this, but I get bored easily so at the moment I’m just going pink. But you can custom mix any shade you want.

Three colors I've mixed together. This particular mix achieves something half way between red and pink.

Three colors I’ve mixed together. This particular mix achieves a pretty shade of raspberry. Red Wine isn’t necessary but here I’ve added it for some extra depth.

IMG_1162Now then, line a bowl with saran wrap so you don’t ruin it, and put your colors in. This part is going to be like mixing water colors in class when you were a kid. You’ll also need a tint brush, and these can be obtained at a drug store very cheaply. You can play with this and keep experimenting until you get a shade you really like.

So mix all this up and start painting your roots with the tint brush the same way you applied the bleach or blonde. If the rest of your hair is faded you can now cover it in the rest of your dye chunk by chunk, either with your hands or the brush, whatever you find easiest.

IMG_1167

Yes, this is my head covered in saran wrap.

Then one helpful thing you can do is take the saran wrap out of the bowl and put it on your head. This locks in the moisture so the dye penetrates better, and minimizes your chance of the dye coming off your head onto the couch. Now if you follow the no ‘poo routine and wash your hair with baking soda like I do you may be wondering if this is compatible with coloring your hair, especially cartoon colors like this. You can read more about that here. Put simply here though, yes, but you need to make sure you wash as seldom as possible and use the PH levels of the baking soda and ACV to your advantage when you dye it by having clean hair before you dye it and only conditioning it after.

So wait a minimum of 30 minutes here for the color to take. Veggie dyes are totally harmless so you can let it sit for as long as you want. Then rinse it all out. Make sure you put your gloves back on before rinsing though, especially if you have gel nails. Those are stains that just don’t come out. Oh, and uh, you might not want to wear white shirts if your hair is down. Ever again. This is off limits now. Enjoy!

And all is right again with the world.

And all is right again with the world.