No. No no no no no. No.
I’ve been dying my own hair for over 11 years now (wow, has it really been that long?) and I’m often asked how I manage to achieve my color. It’s not as simple as buying dye from a box though. To get bright unnatural colors you need to use veggie dyes, and it’s a 2-step process.
So where do I start?
I used to buy box dyes. It seems like the obvious choice. But while looking through the “reds” section, I can’t help but feel like the people who pick the shades need to go back to kindergarten and revisit the color wheel. Dull auburn is not red, guys. It’s little more than a very warm brown. How exactly did you get your jobs again?
So because this color would start out “almost red” and quickly fade to “not at all red”, I would occasionally punch it up with some manic panic. This would be gorgeous for about, oh, four days. The bathroom redecoration on the other hand would last for weeks. Waste of money indeed. So then a very smart and beautiful friend of mine told me to get Punky Color instead. This happened to be around the time the 24 hour drug store down the street started carrying it, so it couldn’t have been more convenient.
Everyone’s hair is different, so you may have to try a few brands to find the best one for you, but on me this is ideal. This shit does NOT fade. After 2 months my color is just slightly more subtle, and in high quality photos is shows up as bright as the day it was done. With my current routine of washing just once a week, it hasn’t noticeably faded at all by the time I need to do my roots.
There is only one issue here, and amusingly enough the beauty consultants at the drug store seem to have no idea about this. Veggie dye does not contain developer, so it doesn’t exactly work on virgin hair. In general it is expected that you will bleach your hair first, so it will be damaged enough to hold the color and have a nice light base so it comes out really bright. I find bleach harsher than I would like, using it makes me nervous, so I start by dying my roots blond. Make a lot of partings in your hair and just slather it in there, making sure to get behind your ears and all around your hair line. When that’s done, I like to scoop up some dye with my fingers and slide them under my hair and rub my head all over with it to make sure I got it everywhere. If this is your first time going bright, you’ll have to lighten the whole thing.

Step 1: doing roots with blond dye.
Important note: You cannot dye your hair blond if it’s not at least light brown already. Why? Box dyes work by stripping (hence the the developer) your color and depositing their own color in one step. But they don’t contain enough developer to lift your hair more than 2 or so shades. If your hair isn’t light already, just use bleach. Pro tip: Make your blonde dye last longer by mixing a third to half of each bottle from the box in a bowl and save the rest for later, similar to using bleach and mixing dye as explained below.

Step 1 = complete.

Step 1.5: Dry hair to at least damp in preparation for the veggie dye. And yes, I’m topless. Why ruin a shirt if I don’t have to?

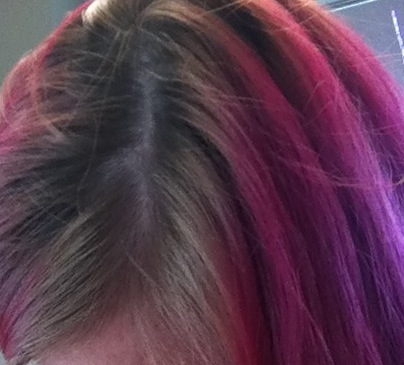
This is from months ago. It’s like a sunrise!
And now a big secret: Red veggie dyes fade either pink or orange, and most people don’t really want that or they would have dyed it pink or orange in the first place. The best way to avoid either is to mix an orange-red with a pink-red. Yes, you can custom mix with veggie dyes! They cancel each other out and fade gorgeously, to a soft rose red. I used to do this, but I get bored easily so at the moment I’m just going pink. But you can custom mix any shade you want.

Three colors I’ve mixed together. This particular mix achieves a pretty shade of raspberry. Red Wine isn’t necessary but here I’ve added it for some extra depth.
 Now then, line a bowl with saran wrap so you don’t ruin it, and put your colors in. This part is going to be like mixing water colors in class when you were a kid. You’ll also need a tint brush, and these can be obtained at a drug store very cheaply. You can play with this and keep experimenting until you get a shade you really like.
So mix all this up and start painting your roots with the tint brush the same way you applied the bleach or blonde. If the rest of your hair is faded you can now cover it in the rest of your dye chunk by chunk, either with your hands or the brush, whatever you find easiest.

Yes, this is my head covered in saran wrap.
Then one helpful thing you can do is take the saran wrap out of the bowl and put it on your head. This locks in the moisture so the dye penetrates better, and minimizes your chance of the dye coming off your head onto the couch. Now if you follow the no ‘poo routine and wash your hair with baking soda like I do you may be wondering if this is compatible with coloring your hair, especially cartoon colors like this. You can read more about that here. Put simply here though, yes, but you need to make sure you wash as seldom as possible and use the PH levels of the baking soda and ACV to your advantage when you dye it by having clean hair before you dye it and only conditioning it after.
So wait a minimum of 30 minutes here for the color to take. Veggie dyes are totally harmless so you can let it sit for as long as you want. Then rinse it all out. Make sure you put your gloves back on before rinsing though, especially if you have gel nails. Those are stains that just don’t come out. Oh, and uh, you might not want to wear white shirts if your hair is down. Ever again. This is off limits now. Enjoy!

And all is right again with the world.