Big Boob Fakery and my first attempt at Youtube

You may remember a post I wrote a long time ago called Big Boob Fakery. Well… everything I wrote was a long time ago. So I figured it was time to freshen up my approach. I just made my first youtube video, a video version of Big Boob Fakery, and it’s hilarious in it’s amateurishness. Here’s to learning and growing and trying new things!

Burlesque Beginners Dos and Donts

Aug16th2015-13

I’ve finally begun performing burlesque, and it’s been super hard work and a hell of a lot of fun. It’s had me somewhat creatively distracted for a while too, so it’s about time I check in with you guys here to teach you something new, in my usual by beginners for beginners format, with the help of my new partner Riley Strange!

So you’re intrigued by burlesque and you’ve never done it before, so you want to give it a shot. To go to shows and see the finished product on stage can feel pretty overwhelming when you have plans to try it out yourself. Just how does it all come together? If you don’t have a mentor to guide you you might be totally lost. Let us lay down a few simple dos and donts to get you started.

Riley prepared to go on stage for her Alice in Wonderland routine

Do…

-Your research. Learn by taking a class if there are any in your area, watching youtube videos, going to shows, reading up on burlesque history, and perusing informative websites such as 21stcenturyburlesque.com. Jo Weldon also has an awesome book on the subject that covers way more than I can here in a puny little blog article.

-Cut the damn tags off your clothes. As a performer you are delivering a fantasy. Tags and other flaws like stains, wrinkles and tears take the audience out of the moment.

-Be creative with your costume. Even if you must wear something off-the-rack, try to alter it in some way to make it one-of-a-kind. The last thing you want is someone in the audience pointing and going “Hey, I have that same bra at home!”

Adding rhinestones to these Victoria’s Secret panties add a little special sparkle

-Choose a song you absolutely love. With rehearsals you’ll have to listen to it a hundred times, so if you don’t love it, it’s going to be a nightmare to perform to once show day arrives.

-Be aware of what your audience will enjoy while not compromising your own tastes.

-Go big or go home. This is not a movie or a photoshoot, and there are no close-ups. Makeup and movements need to be seen from the back row. You WILL feel silly, at least in the beginning. You’ll get used to it.

-Make sure your stage name isn’t already taken by somebody else. A Google search should be pretty much all you need here.

-Make the most of your abilities. Any abilities. Dancing, acting, costuming, comedy, acrobatics, the list is endless.

-Be prepared for people to have misconceptions. Don’t get offended, it’s part of the deal. It’s up to you if you want to work towards changing their mind or not.

-Try to find a mentor if you can, to guide you through this stuff or just keep you company while you’re gluing on rhinestones.

-Consider the length and pacing of your song. You don’t want to feel rushed, or end up with nothing to do because the song was too long or slow.

-Be reliable and professional. This might be a fun job, but it is a job. It deserves to be taken seriously.

-Come to your show prepared. Remember not only the elements of your costume but makeup, pastie tape, a Tide stick, etc. This is the huge packing list Riley and I had last time we did a show, and this is only for three acts between us.

All this shit for less than 15 minutes total stage time. Also handy to make sure you leave nothing behind at the venue at the end of the night.

-Plan something achievable. This is something me and Riley have personal experience with. We kept coming up with extremely ambitious routines that were just way above our level. If you keep doing that you’ll never be able to complete the process to see it come to life on stage. You can keep having ambitious ideas, just tuck them away for a future date. A routine does not have to be difficult in order to be entertaining.

April 1 2016 - Heart-Shaped Box

Don’t…

-Think that the performances you see are the rules. This is art, there are no rules. You don’t have to wear a corset, you don’t have to choose a jazz song, you don’t have to know how to dance (although it helps) and believe it or not you don’t even have to be sexy. Let this be an expression of who you are, even if it only relates to one of your many facets. Well ok, there is one rule, and that is that you must be entertaining.

-Wear anything flat black unless your character depends on it. It’s too drab and somber. Either add some sparkle and shine or choose something more lively. Or better yet, both.

-Limit yourself. Explore new horizons and keep things fresh.

Just a backstage selfie with Adore Delano. No big deal 😛

-Focus on reasons why you “shouldn’t” do burlesque because it’s just not true. Any adult age, any gender, any body type, and any ability level (there are even burlesque performers who use wheelchairs in their acts) is accepted. This is the real beauty of this art form. It’s about celebrating what makes you you.

-Forget your face in your choreography. It just won’t look good if you look like you’re taking a shit while you get undressed.

-Be a diva. Ok this isn’t just a burlesque tip, this is a life tip. There’s a difference between honestly expressing something that’s important to you and acting like a spoiled child about it. You’re not above anyone.

-Panic if something goes wrong. Because it will, even to seasoned performers. But guess what, the audience probably doesn’t know, and if they do they’ll think highly of you for being able to just move on with the act instead of freezing in a panic. Riley and I have both performed to the wrong track when the DJ made a mistake, and neither time could anyone in the audience tell. Keep in mind we are both still beginners. It happened to Riley on her second day.

-Make excuses! You’ll just keep missing out.

I How I Planned a Hassle-Free Vow Renewal in One Week for Only 22$*

Well, it’s now been a whole five years since Mr. Strange and I were married. And for almost all of that time, I’ve been grumbling bitterly about our wedding. I won’t bore you with the details but let me just say I wanted a do-over. I mean a second do-over, because the two sides of my family are like oil and water and I needed a chance for my dad to be included, too. Well, it happened, and the ironic thing about weddings is it’s the kind of thing that you really do get better at with practice. Now that we’re at #3 I think it’s safe to say we’ve gotten pretty damn good at this.

It started a week before. Our fifth anniversary was coming up, and we wanted to make it special, though our finances were hardly improved since we did the real deal. On that quiet Saturday at work I got into the planning mood, and just out of curiosity I Googled “cheap wedding venues in Winnipeg.” Literally the FIRST suggestion to come up, on Yahoo Answers, was a place I’d never heard of called Pineridge Hollow just outside of town. It’s a restaurant that also includes a clothing and furniture shop, and gorgeous outdoor surroundings specifically intended for weddings. I looked up the place online and really didn’t need to look any further. We made a reservation at the restaurant for 15 people, and didn’t ask for any set-up. A Facebook event was made and that was about it until the day of the event itself. Let me dissect the rest before I go on to describe the evening.

Invitations: None = 0$. We just created a Facebook event like all the kids are doing these days.

You gotta like free.

Rings: We’re already married, so we already had them and didn’t need a ring pillow either. Free again! But if this is your first wedding together, here’s where you can get some unique and affordable options.

Decor: Nothing but nature, baby. And centerpieces? Nah. 0$.

Mr. Strange’s clothes: Nothing but what he already owned; nice black pants, a blue button-down from our real wedding, and a nice hat that he wears often. 0$.

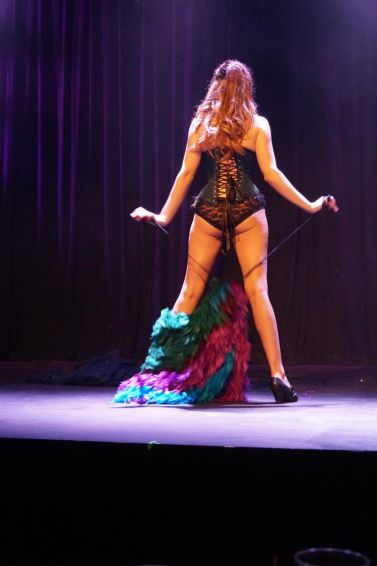
Wedding dress: Years ago I saw a beautiful pale pink cocktail dress online going for just $108. Things sell-out often on that site, so I couldn’t afford to put it off. Because I owned this for so long before the big day, had worn it twice already and will definitely wear it again, I’m not counting it as an expense. It couldn’t be more perfect for the occasion, but in the end I just pulled this out of my closet. 0$.

Veil: I didn’t wear one then, and I didn’t wear one now. $0.

Shoes: It takes a mighty special pair of shoes to not leave my feet beaten and bloodied by the end of the day, and when I find them, I stick with them. Who wants to pay for pain? I’m not a masochist. I wore my everyday shoes, even though they’re black and didn’t technically match my pastel dress. 0$

Hair and makeup: I did this myself instead of visiting a salon, and accessorized my hair with a gold hair vine I wore on our wedding day. I bought nothing new. 0$.

Jewelry: You guessed it, I didn’t wear anything new here either. I wore some “diamond” studded fake tapers (I bought them before I actually started stretching, and if I didn’t wear them now I probably never would) and a key necklace my brother made for me many years ago.

DJ: Music wasn’t involved in this particular vow renewal, but if it had been I would have DJ-ed myself with the help of an iPhone. 0$

Photography: Mr. Strange brought his fancy camera along and we all took turns shooting each other with it. More time would have been nice for this, but oh well. 0$

Food and alcohol: We were at a restaurant and all ordered for ourselves. As a gift, my dad covered the two of us on his bill. So with that, 0$

Wedding cake: We could have ordered dessert with our meal, but we were all full. If this had been a bigger event, I would have bought a lot of cupcakes. But as it stands, 0$

Venue: It does get used for “real” weddings frequently, but as far as our small group was concerned this was little more than some people going to dinner. We also didn’t ask for any special set-up, so the venue fee was 0$.

Officiant: As ours was not a legally binding ceremony, we printed our original wedding ceremony, changed a few words, and had it read by a very good friend. 0$

Other: Vow renewals don’t have wedding parties, which means no bridesmaid’s dresses, groomsmen’s suits, and other various things. While real weddings usually have these things, they’re not a necessity. If you’re broke, consider keeping the wedding party to a minimum and letting them wear their own clothes.

Flowers: this was literally the only true expense in our entire event. They came from the grocery store, and I tied them with gold ribbon from the dollar store. total cost: $22.

That’s it! Sunday morning we got up and went to the Pancake House for brunch, and while we ate Mr. Strange Googled on his phone (he’s such a rude fuck) for an open florist nearby. None were open, so, we headed to the grocery store. I had a small pink and white bouquet in mind, but grocery stores are not usually known for their wide flower selection. What they did have, I think since it was Pride day and it’s huge here, were half-dozen bouquets of rainbow-colored roses for $20. At the dollar store next door I bought two little spools of gold ribbon. When we got home I slightly shortened the stems and wrapped them tightly in the ribbon. DIY florist-ing, bitches!

They're gay, and they're spectacular.

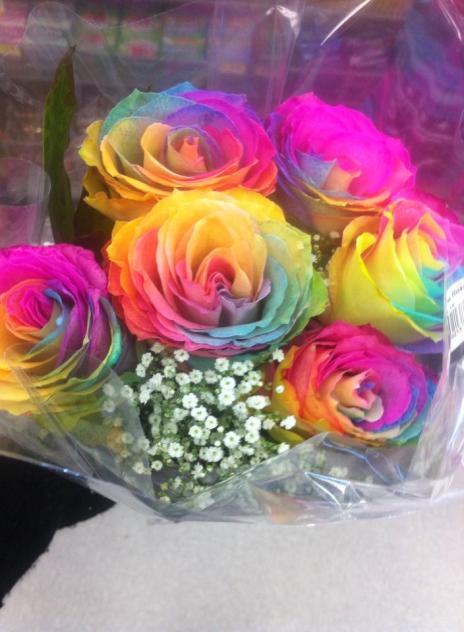
They’re gay, and they’re spectacular.

If you’re curious how this is done and/or want to make some for yourself (of course you do), you start with white roses. Split the bottom of the stem into as many pieces as you want colors, and put each piece into a separate vessel of water, each with a different color of food coloring. As the roses drink up the water, they’ll soak up the color too, and 24 hours and some unicorn farts later, you’ve got yourself the coolest damn roses ever and a whole new way to honor Pride.

So anyway, I did my own hair in a very simple earthy style with just loose curls and a couple pieces on the sides pulled back with my hair vine pinned across the back, and did my own makeup with a little more care than usual. Mike got dressed too and we drove to the venue where we met up with my dad and the rest of our guests.
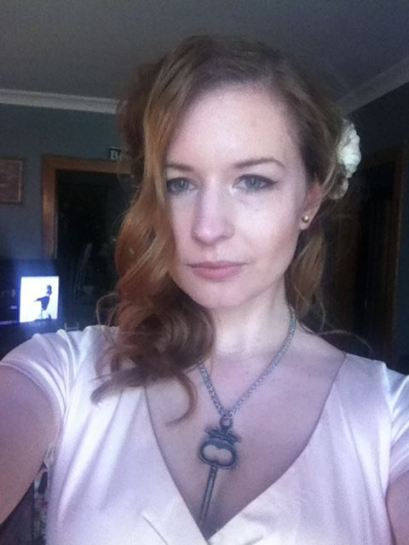
Pre-event selfie!

Pre-event selfie!

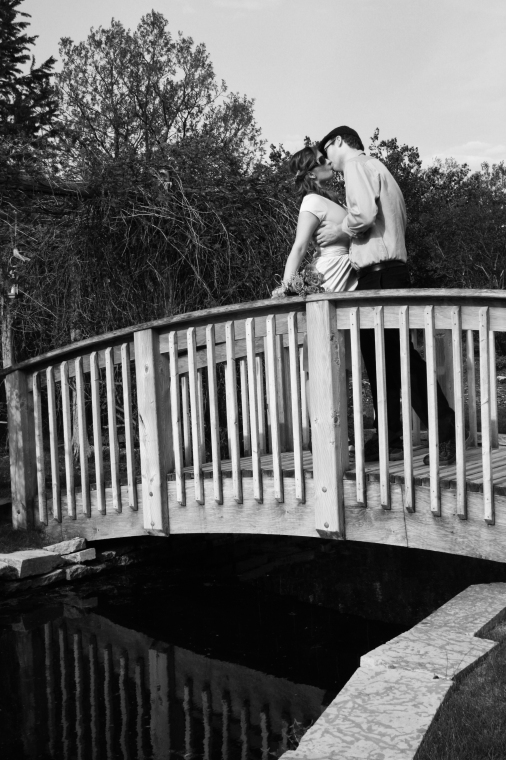
Pineridge Hollow is such a charming little place that I was a little bit sad I hadn’t known about it years ago. It was perfect, exactly what I’d always wanted. Simple, pretty, rustic, full of character, and with a huge outdoor element. Someone else was having a full-on wedding reception in a large tent behind the main building, but it was somewhat tucked away and none of us were in each others way – the area we were in had nobody in it but us. On the lawn and among the scenery we were able to spot no less than 7 wedding arches where a ceremony could be held, including stone steps, beautiful benches and chairs, and a small artificial pond with a little waterfall and a bridge crossing over it into a small space enclosed by… what would you call that? It was like a room made of branches with a couple lanterns hanging from the ceiling. It was the perfect size for our little group, and made it feel wonderfully intimate, so that’s the spot we chose. Theresa, who was my maid of honor at our wedding, read our original though slightly edited ceremony. It was meaningful but it was pleasantly short, just under 10 minutes or so. When it was over we high-fived. It was great.

We all goofed off with the camera for a bit, and at 6pm we headed in for dinner. We were lead upstairs to a minimalist room with hardwood floors, exposed rafters in the high ceilings, and huge windows. The food was gorgeous and delicious, and it felt amazing to be surrounded by so many people who were close to us, knowing they were there to help us celebrate our anniversary. It meant the world to me. My only complaint was that the food was painfully slow to arrive. It took an entire hour and a half. WTF! oh well, if that was our only complaint I guess the whole thing worked out pretty damn well.

Me and the girls

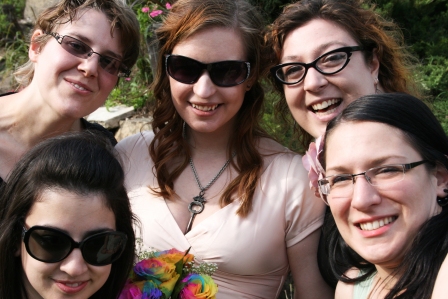
Being surrounded by some of my best friends in the world: Priceless

If I didn’t have such a difficult family situation, which pushed us into eloping, I can honestly say this is exactly what I would have been looking for the first time around. The guest list would have been bigger, we would have sent out proper invitations, and we would have been the ones in the big tent pumping awesome self-DJ-ed tunes. But essentially this was perfect. It was so simple and relaxed we could just focus on how it felt to enjoy each others company. My dad finally got to see us take our vows. It was awesome. I would totally do it again.

Now of course I realize that the chances of anyone recreating this down to the last cent are slim to none, but I hope there are still some ideas in here that you may find helpful. The most important thing about planning a wedding is to prioritize. Think about what really matters to you, focus on that and don’t sweat the rest. Your wedding is over so damn fast, but hopefully your marriage lasts forever.

IMG_1898-Edit


*Goddamn, that Asterisk makes this look like a shady sales deal. I promise it’s nothing sinister. I just need to mention that if yours is a legal ceremony, there will be some fees involved with that. Then probably rings, and maybe your dad won’t buy you dinner. Plus our guests paid for their own food. Really though, when you consider the cost of the average wedding, this amount is quite negligible.

How to Get Out of Bed

This article was originally published on Offbeat Home http://offbeathome.com/2014/03/how-to-get-out-of-bed

I get it. What others might see as a chronic case of laziness is actually paralyzing depression. The thought of getting out of bed is like running a marathon. The thought of getting better is like getting a PhD in life, something you want no part of. You haven’t even changed your clothes in four days. Today, we’re going to take it easy. Forget about all those thoughts that are slowly crushing you. Today we’re just going to take a shower. That’s it. Don’t worry if you forget your meds right now. If a shower is too much, run the bath. Just put two feet on the floor, get in there and soak.

Take as long as you need to. Don’t think about the mean things people have said while they thought they were helping. They don’t get it and it’s not your problem. You don’t owe the world anything but your best effort, and it already got you in here, so you’re doing great.

Now look at what you’ve accomplished. More than you have in days. You’re doing it. Let’s build on that. Time to take your meds. It’s an important step. The only thing you have to do today is take your meds.

You’ve done some very important things. Facing the day can be tough, but you’ve already gotten so much out of the way. But there’s just one thing you need to do. All we’re going to do today is get dressed. It can be ugly, it can be comfy, it can be something that makes you feel beautiful. There are no rules. Wear what you want. Don’t worry about impressing anyone. There. Doesn’t that feel better already?

All we’re going to do today is eat. I know you haven’t been hungry, and if you were you don’t feel like you deserve to eat anyway. But you have to eat to live, and for now, for just this moment, that’s what’s going on. You’re living. It’s a big deal, but a bowl of cereal isn’t. You can sit under your therapy light while you eat. You can cuddle your animal or a teddy bear while you eat. Just eat. Eating is showing yourself some of the love that you need right now.

It’s over. You’ve done so much. There are no expectations placed on you today, but do remember that there is a strong correlation between depression and creativity. You might not realize it, but there’s something in there that you’re amazing at. Write, paint, compose. It doesn’t have to be good. You don’t have to finish it. You don’t have to show anyone. But just look what you can do. Look at simply what you can get done. You who thought just an hour ago they couldn’t even get out of bed. This is huge. You can do this.

How to Give Your Own Cheap Ass a Hair Cut

I have a confession to make. I have not seen my stylist in a year. Please know that it’s not because I’ve been disloyal. It’s because I’m a cheap fuck; I have engaged in the sin of self-hair-cutting, and sometimes sin feels good.

IMG_3231

This is for anyone with medium to long hair. Like many of my methods, this is the frankenstein combination of various others I’ve gathered from around the internet and put together to make my very own idiot-friendly creation. To do this is typically considered either brave or stupid, but considering that hair grows, and common sense tells us to cut a little less than we actually want to so we have room to go in case we panic and run to a salon for a fix, I would call this merely brave. Let’s begin.

I do this on dry hair. It moves around more easily and wet hair shrinks as it dries, so this way you get no nasty surprises. We are going to start by cutting the layers first. I know this is unusual but considering they’re the most daunting part I like to start here, go slow, and then make the length match up to where I want it. If you don’t want layers, skip the rest of this paragraph. First choose an area on your head where you want the layers to be shortest, from which they will progressively radiate outward, and put your hair in a perfectly smooth ponytail at that exact spot. I like layers around my face, which means I place my ponytail in the middle of my forehead, making me look like a demented unicorn. Now all you’re going to do is cut the ponytail. Go slowly here. Even if this means you didn’t cut enough and have to keep doing it again, it’s free so who cares, better safe than sorry. I tend to cut about one inch at a time. Because your hair gets progressively longer as it moves away from the ponytail, placing it here will result in a very vintage-friendly face-framing rounded shape, not to be confused with an authentic middy cut but which still totally does the job.

Warning #1: Do not judge the length until you’ve brushed it all out. After being in this crazy high ponytail it might want to still go up before it goes down, making you think you cut way more than you actually did. Do not panic. You did not magically cut one inch that turned into five, physics do not work that way.

IMG_3238

When the layers you want the shortest are about where you feel they belong, it’s time to move on to the next step, the overall length. It can be helpful here if you like to use the neckline of a shirt as a guide, from modest bateau to deep and plunging. Part your hair where you normally keep it and bring it all towards the front. Doing just one side at a time, lean your head wayyyy back, brush and gently clasp the ends of your hair between your fingers. Tilting your head like this ensures the angle will be right when it’s done. Again, cut less than you really want to. I am VERY conservative here, because we all know what happens when you have to keep evening it out and all of a sudden there’s half a head of hair on the floor, right? Right.

Finally, the last step is to check how even it is at the back. Grab a hand mirror and take a look. are there any pieces that are just too long? Make a low ponytail, perfectly centered, and slide the elastic gently down until you can pull the ends of the ponytail within view. Now you’re NOT cutting for length here in the least, you’re just grabbing all the bits that escaped. Check again. It should be all good!

Warning #2: If you hair is dirty, slept-on, previously styled or whatever, you might think it looks like crap. Before you decide to be disappointed, don’t cut one more hair. Just get in the shower and wash it. Once it’s all clean, dry, and lying where it should you’ll probably notice a huge difference. I absolutely love my hair cut this way.

It’s at this point that if you’re a bit obsessive like me, you can start grabbing random sections and tweaking them. I tend to play with it for days afterwards, even though it always comes out looking exactly the same. Whatever, it’s fun. It’s especially fun to be able to say you’ve cut this fabulous style all by yourself and enjoy the tons of money you’ll save. Lookin’ good!

IMG_3235

For more awesome hair-cutting tutorials go check out howtohairgirl.com. I love that site.

Androgynous Style

Whether you’re agender, third gender, both genders, or just looking to explore new style territory, androgynous style can be a challenge. But for women, this can be easier to pull off for than for men. Not that men should ever be concerned about what others think either! And while this post is primarily geared towards bio-women, bio-men may find something useful in this as well. Androgyny is for everyone after all. Now, I’ve come to understand that those who really aren’t looking for a feminine style tend to dress a little… lazy. I don’t mean this as a judgement. But when you’re unsure or just a little apathetic, jeans and tshirts can get you into a bit of a rut. Here are some fresh ideas, along with some basics for those looking to try this out for the first time.

First of all, the most important thing I think to ask yourself is – What elements of my current style would I keep if I suddenly woke up in a man’s (or woman’s) body? Even if your answer includes dresses and skirts, these things are part of your style that really fit you and represent who you are. Keep them, no matter how girly (or masculine) they may be. Your answer to this may change day to day and that’s ok too. I know for a fact that if I was a dude I would totally still rock long pointed nails, though I may be more bothered by it when a fresh dye-job stains them pink. Also not such a great idea for job interviews.

Clothes. While I still recommend clothing made for women as they’re tailored to the shape of your body, we’re lucky that unlike it was in the past, it’s easy to find women’s clothes that are inspired by menswear. There are also varying degrees of this and in various styles. We can easily find traditional and edgy suits, boyfriend jeans, and unisex items like tshirts and sweaters, and button downs in any store. Trench coats and pea coats are universally flattering. For underneath, minimizing bras and shapewear for the hips will help streamline those curves, should you so desire.

Accessories. You might not want to wear a tie in the traditional way, but have you thought about wearing one as a belt? Sweater vests look awesome on anyone, and while you may want to skip jewelry altogether, keeping things basic or edgy is a way to make it work with this style. Unisex perfume is available at various shops such as Goth Rosary. Newsboy hats are adorable and dapper. And call me a hipster, but I love pocket watches. I’ve also been known to wear a black underbust corset (of course) in the style of a waistcoat. For many of us, ditching a bag isn’t an option, but you don’t have to carry a traditional purse. Book bags and laptop bags can be carried by anyone. My own favorites are messenger bags because I can wear them instead of carrying them and they’re big enough for my books and all the garbage that eventually piles up inside. These bags also tend to appear much more simple and casual than girly. My new one has a ouija board design.

Hair. You don’t have to get a pixie cut, though I have to say this is gorgeous. Women don’t have a monopoly on long hair, so keep that in mind. For style, simple and natural does the trick. If you like curling your hair, go for tousled waves over perfect ringlets. Bed-head, slicked back, a classic low ponytail or just regular ol’ down are easy. Some other fun options are a pompadour with a ponytail or french twist, or hidden under a hat. If you have long hair and want to fake a cut, sweep your hair back and over your head so that the ends fall down your forehead like bangs. Use a firm headband to hold this in place. Then hide the the majority of it with a hat, and style the front however you like, such as side-swept, bed-head, or spikey. For color consider going all natural, super natural-looking, or try bright and fun colors like blue and green. I’d stay away from natural colors in unnatural shades, like the type of thing you get with brands like Feria.

Makeup. Of course, skipping makeup altogether is the most obvious option, but some of us just aren’t that brave or laid back. To bring out your best without obviously having anything on, try BB cream or a light foundation, translucent powder, and some light bronzer on your temples and under your cheek bones for dimension and contouring. If a more obvious look is more your style, try a bold eye in a neutral color like black or grey, and keep lips looking more natural with a clear or neutral lip balm.

While there’s plenty other info out there on feminine looks inspired by men, there’s an unfortunate lack for those who just want to appear truly androgynous. So if you have any ideas or tips to share please comment or share some pics! Let’s brainstorm this up.

DIY Bookshelf

If you’re like me and you have a habit of occasionally reading and getting angry, as most people do, you’ll know that “bookcases” sold in stores exist only for storing a small pot of flowers and a couple CDs. Trying to store actual books on them is an absurd idea, as you will no doubt see here.

Sonofabitch!!

Sonofabitch!!

It is almost always true that the older something is, the more it was built to last. So vintage or antique bookcases are always superior, and often more beautiful,  but not always affordable. It may also happen that the place in which you’d like to store your books is not ideal for a bookcase. So this, Strangers, is why I built my own, and why you should consider doing so too.

IMG_2728

First of all, this shelf is built right into the wall, instead of being a standalone book case. So to give it a more “complete” look as opposed to something just floating (which is still not at all a bad choice) I covered the wall where the shelves would be with an accenting wallpaper, which came in a little roll at Walmart. Our living room is a beautiful grey-blue, so for the wallpaper I chose a distressed silver damask. I would also love to make a second accent with this above the mantle, but that will be for another day. The exact height of the paper doesn’t really matter. I matched mine up with the light switch and thus is looks somewhat like a back splash. You may want to get some help with this, because putting it up is very awkward. Consider it a team-building exercise.

A shelf I built 8 years ago with bird feeder hangers, and a great place to display my sword.

A shelf I built 8 years ago with bird feeder hangers, and a great place to display my sword.

Next up, the brackets. To know how far up the shelves need to be from each other, measure with your largest book. That way you’ll know that all of your books will fit and won’t have to be placed front end down, because that’s annoying and you can’t easily see what the book is that way. As far as horizontal distance, we placed each bracket more towards the center than on the absolute edges of the space to prevent bowing of the shelves. The longer your shelves are of course, the more brackets you’ll need. You can get these at different price points from Home Depot, but years ago I used beautiful wrought iron bird feeder hangers that cost just $2 each, so keep in mind that improvising is totally ok here. Remember also to use a level.

IMG_2729

For our own shelves we salvaged what was left of the old bookcase, but barring any available scrap you can get some small sturdy shelf boards from Home Depot or even better just cut some solid wood to size and stain it the shade of rich mahogany, or whatever color you prefer. You don’t absolutely need to secure the boards to the brackets. We didn’t. You’ll see here that although we used a level, the boards appear to be slanted. This is because the actual house is slanted, so what can you do.

Because our baseboards are quite high and we didn’t want to ruin them with holes, we used the baseboards themselves as a support system for the bottom shelf. To prop up the remaining corner we piled beautiful yet totally useless old dictionaries to the correct height. If your house is similar to ours in this way you can do the same thing, and use anything you like here, like a pretty dowel or a skull.

IMG_2988

Speaking of skulls, no spooky library is complete without one, so among some of the decorative features I placed on the shelves is a beautiful skull candle. The wax inside is red so it looks like it’s bleeding when you light it, but we thought it was just too pretty to burn. Don’t overdo the decorations though, this is a place for books after all. If your decorative items are heavy and unbreakable enough you can use them as book ends. Just to be sure though I used some cheap standard ones I got from Staples. You’re going to need book ends if your shelf doesn’t have sides!

IMG_2730 IMG_2731

Ta-Da!

Creating shelf space in this way doesn’t have to be just for books, and is ideal for small spaces. We did this for night stands, and you can also put a very long shelf on the wall behind your couch to act as a console table or end table. You can even create a lovely little surface by lining an old drawer with beautiful wall paper and hanging it vertically on the wall as you can see in this lovely example. Of course once I do this I’ll probably still fill it with books.

Unleash Your Inner Six Year Old With Spool Knitting

The other night someone on Facebook posted some pictures of yarn bombing. For some reason this immediately reminded me of when I was a little kid, and I had spool knitting to keep me occupied on long trips. What the hell is spool knitting you ask? Spool knitting aka French knitting is basically knitting done in a constant spiral instead of in rows. It’s typically used to make sleeves and socks, but a small spool, like the kind I used as a kid, produces what’s basically a long rope, or an i-cord. Since I’m apparently a highly suggestible person I of course wanted to start a spool knitting project RIGHT NAO!! though because it was 1am I couldn’t go to the craft store to get a knitting spool.

Well clever me, I figured out how to make one, and you can do it too. I used a toilet paper roll. I cut into the top of it so that I had four “prongs”, similar to if you were using this to make a little cardboard castle tower, and reinforced the prongs with toothpicks and painter’s tape like a splint, since that’s what I had lying around. You could also tape four Popsicle sticks to your roll, and many people stick nails into an actual wooden spool. But as long as you have a little tube with prongs around the top, you’re good.

Ta-Da. Ava Strange in a new episode of McGuyver, coming soon to a day dream near you.

Ta-Da. Ava Strange in a new episode of McGuyver, coming soon to a day dream near you.

To start your rope, make a slipknot in some yarn and put this on one of the prongs, with the tail hanging inside. Loop the yarn around the other prongs. Then you’re going to wrap the yarn around and around, always lifting the yarn from the last pass up and over the new yarn and prong. Eugh, this is easier to do than to explain. Here’s a video that I didn’t make.

If you don’t have a knitting needle like in the video, you can use another toothpick, and if you have stiletto nails like me you won’t need anything!

IMG_2811

This is what it looks like coming out of the spool. You can also easily change colors by tying the old color to the new one and tucking the knot inside the rope as you continue to knit. From the top it will look like this…

IMG_2812

IMG_2813

Switching colors.

So besides keeping six year olds occupied on road trips, what’s the point of this? There is of course killing time and making yourself appear more talented than you really are; there are a TON of different projects you can do, from necklaces and scarves to purses and super unnecessary pen cozies. But the simplest thing to make is a great big circle by sewing your rope around and around. Depending on how long it takes you to get bored you could end up with anything from a pot holder to a rug. Mine just passing dog/cat bed territory right now and will hopefully grow up to be a rug. And it better, because there is a lot of fighting for space on the thing right now. You could also make two of these circles, sew them together, and stuff them to make a pillow. And if you’re Hugh Hefner and you have a round bed, this is the dorkiest/most awesome way to get a new blanket.

Or perhaps a new shield for your grandson, Captain America.

Or perhaps a new shield for your grandson, Captain America.

That’s pretty damn good for some yarn and an old toilet paper roll eh?

IMG_2869

I’m his hero right now. I think I’ll call myself Captain Canada.

At Home Hair Color Theory

Many years ago, I dyed my hair a lot of different colors. I spent a lot of time on haircrazy.info, which is a fantastic site, and learning what’s up. I was so enthusiastic about this that I became the at home hair color expert on allexperts.com. But this was pretty short-lived. Why? Because instead of being asked about how to achieve beautiful blue, green, or purple hair, I kept getting asked the same thing over and over – I tried to dye my hair blonde but it turned orange! omg what do I do?!

Sigh. People just need to learn to read instructions sometimes, amirite? But let me break it down for you, along with all the other basic info about dying your hair salon-free.

Bleach vs blonde dye and how box dyes work

Bleach is something that, lack of my knowledge of chemistry aside, lightens hair. Of course we know this. But what many people don’t really know is that it is NOT a dye, and absolutely not the equivalent to dying your hair blonde. Bleach will strip color whereas dye adds it. Bleach doesn’t make your hair blonde so much as it makes it yellow. Starting from black, bleach will go through stages of red, orange, yellow, white, and finally bald. It works with heat, so this is why you need to start at the tips and work your way up gradually, otherwise the heat from your scalp, making the bleach process faster, will result in a fire effect which is admittedly pretty awesome looking. This is also why bleaching out green or blue, which are the opposites of red and orange respectively, is very hard. It gets lighter, but it’s tough to make it really go away. Bleach makes your hair porous, and the lighter it is the more porous it is, which is why bald follows white. You want to be very careful at the white stage, and make sure your hair isn’t already too damaged. Bleach is TERRIBLE for your hair (and burns like hell on your scalp), but sometimes necessary to get the color you want. Please use bleach responsibly, and you’ll be ok.

Bleach is necessary in achieving white or silver/grey hair. To get white, a weak lavender veggie dye (for example Manic Panic Virgin Snow, or any shade of purple heavily diluted in conditioner, like half a teaspoon/1 cup) is used after bleaching to the lightest shade you can (please don’t bleach to white, I will not be held responsible if you lose clumps of hair). This works because purple is the opposite of yellow so the two cancel each other out. Silver/grey is achieved by doing the same thing except with very weak blue.

Bleach also comes in different strengths, called volumes. There’s 20 vol, 30 vol, and 40 vol. 20 won’t do much, 30 is the most commonly used, and 40 will destroy your hair if it isn’t in good condition.

Dye on the other hand uses developer to lift your color like a bleach, and deposit the color in its place at the same time. But it doesn’t have enough developer in it to lift your hair more than two shades or so, hence the guides you see on the side of the box. If you try to dye dark hair blonde, it won’t be able to take it all the way there, and depending on the shade it could turn your hair orange or some other color you didn’t want, or just not do a damn thing at all. For dark hair to go blond you need to bleach first to lighten it to the level you want, and dye second. However this is kind of expert territory, and very easy to get wrong. If you intend to do this I beg you to go to a salon.

There are shades of blond. Strawberry blonde has a red base, golden blonde has a yellow base, and ash blonde has a green base. Yes, I said green. People have ended up with green hair.

One last note: Semi-permanent box dyes are much less damaging than permanent ones because they contain much less developer, if any. Their purpose is to be used to enhance the color you already have and fade after 30 days. However, if you intend to dye your hair quite a bit darker, it will last just as long as a permanent one, with a fraction of the damage!

How veggie dye works

Veggie dyes are natural conditioner-based dyes in bright cartoony colors that work by filling up the pores in your hair created by bleach and/or other types of damage. You need to start with bleach or very light dyed blonde hair for it to really get in and show up as bright as it’s supposed to. Used on darker or natural hair, it will show up in a much more subtle way, and will probably fade quicker too. Because veggie dye has no developer in it, you can mix colors to get the exact shade you want, and you can leave it in your hair indefinitely. Some people even cover their head in saran wrap and a towel and sleep with it overnight before rinsing it out! Keep in mind here that this color isn’t opaque, so when you’re dying one color over another it won’t show up in its purest form. Think of it as layering different colors of cellophane. Blue over red will show up a lot more purple than intended, and green over red, as I learned when I was 19, is just gross.

Coloring alternatives

Sometimes you just really don’t want to do the damage to your hair necessary to achieve the color you want. So there are a few ways of getting around this. This involves using extensions, so your own hair isn’t affected. The best way to do this in my opinion it to get a set of clip-ins. If you can’t find the color you want, buy blonde ones and dye them the color you want. “Human hair” is not actually human hair at all, but means that it behaves like it, despite often feeling like barbie hair, so as long as it’s labelled this way you’re good to go. You can also dye it in crazy patterns, such as stripes and leopard spots, and some people sell clip-ins like this on etsy if you don’t feel up to the work. Alternatively there are also what are called “falls”, which attach to a ponytail or pigtails. These are super fun to make and can also be purchased on etsy. If you want something more permanent than clip-ins, synthetic hair can be braided or micro-beaded into your own, and there are lots of sites selling hair for this purpose. Finally, there are a whole lot of alternative subcultures full of people who routinely attach things that are not at all hair into their hair, including wool, plastic, foam, and anything you can think of. If you’re more on the wild side, these can be a fantastic way to go all out and make your hair look like nature never intended. The creativity of these people astounds me.

So there you go! Go make yourselves gorgeous!

How to Model – Posing for Beginners

I’m not a model, but I’ve been modeling as a hobby for about four years. I’ve done photoshoots, live art modeling, fashion shows, and even a bit of TV. It’s not something I take super seriously, but it can be really fun and it’s a great way to help either new photographers who need to practice certain techniques or expand their portfolios, or experienced photographers break away from the daily grind and try something new. So I thought since I’ve done this for a while and there are always people interested in doing it, I would write a quick guide, to be used either for beginner models or just people who want to fuck around with a camera on Saturday. This is not intended to be advice for professional models. They’re working on totally another level. But if you want to try this out as hobby, this might help you out.

-One first important note: SHOW UP. Models are notoriously unreliable, and this is not just rude, but a huge waste of time and probably money for everyone else involved. I have a zero tolerance policy on shoots that I’m involved in behind the camera. If you don’t at least take it seriously enough to respect other people, don’t bother. You won’t last long.

DSC_0143

Photo by TJ Pendragon

-RELAX! Being stiff is the biggest thing that will hold you back. Seriously, you NEED to relax. A lot.

-Don’t be afraid to look like an idiot. In truth, a fraction of your photos will be usable. That’s not because you’re not good at it, it’s just true for everyone who’s not a pro. Out of the 10 pictures you might see in an album, often over 300 were actually taken. This means that many of them are unusable anyway, and not being afraid to “go there” is what’s going to result in magic on those few good ones. Otherwise, the whole thing can fall flat.

IMG_4995-Edit

OMG HEEEEELP! Seriously, it was so hard to get out of this thing.

HEEEEELP! Photo by Jenna Lee

-Use a prop. The biggest challenge is when you’re just standing in front of a backdrop. You wonder WTF are you supposed to do? Having a prop gives you something to interact with, something to do with your arms, and helps you a lot for ideas. My favorite thing so far has been a hoola hoop, but you could use anything, including a wall. When you’re totally stuck, use your own body!

IMG_4057-Edit

Dat ass.

-Don’t forget your neck.

-Make small movements. If you’re new to posing and the idea overwhelms you, moving one body part at a time will not only make things more simple, but give the photographer a lot of variety, and time to see what they might like you to do.

-Point your toes. All the time. Even when you’re standing (heels count).

Foot fetishists gave me my start on Deviant Art.

Foot fetishists gave me my start on Deviant Art.

-Communicate with the photographer. Tell them any ideas or concerns you may have and they’ll work with you while directing you. Directing isn’t them telling you what to do, it’s a conversation and a collaboration. Help them help you.

-If your pose feels physically weird, uncomfortable, or painful, it often means it looks awesome. Sometimes even your damn eyeballs will hurt.

IMG_5469-Edit

IMG_5634-Edit

Photo by Kathy Cruz (Glam Chix Artistry), makeup artist and other model is Elliot James

-If you feel mentally weird, uncomfortable, or painful, you need to stop.

-Whatever you’re doing, do it more. Subtlety isn’t usually the camera’s friend (though it can be).

-Be versatile. Don’t do the same damn style with the same damn pose with the same damn face all the time. That shit is boring. Nobody wants to shoot something they could have photocopied from another shoot you did.

Me? Do edgy and boyish? NE-I mean, YES!

The red nail polish makes this a little less believable. Photo by Shawn Fillion

-Check out what other people are doing for inspiration.

-Keep in mind that a photo is not 3D. The closer something is to the camera the bigger it looks. It seems obvious but the impact is huge. I have this picture where my foot looks freakin enormous because of its proximity to the camera.

See?

See? I’m a monster!! Photo by Chris Wilkinson

-When you’re smiling, have the shot taken while you’re exhaling. It forces you to relax so it looks more natural. Just like when you get a piercing!

-If you have a blinking problem, close your eyes and open them on the count of three. The shot should be taken immediately after.

This is my favorite picture in the world right now.

This is my favorite picture in the world right now.

-DON’T FEEL BAD ABOUT YOURSELF!! Professional models are beautiful, but they’re only one kind of beautiful. Be a role model to people who look like you.

Dat ass.

Dat ass.