This article is probably going to be fairly short, since what I have to teach today is awesomely easy and simple – you don’t have to buy anything for a rat. They don’t even have to be your hair color, though it’s nice if it is, and they don’t even have to be shaped to perfection.
You can of course buy rats. I’ve seen them on Amazon. They’re in different hair colors and snap together at the ends to make a bun shape. Some people decide instead to get some of their hair, or fake hair, and put it into a hair net and shape it. That’s a good idea too. But I do even less than this and it’s been quite a success.
I’ve always been partial to socks in my hair. I don’t mean that they look nice or even particularly sane, but I’ve found them to be a good tool in the ol’ hair arsenal. When the cats kept stealing the rag strips I was using for curling, I started using long, thin trouser socks, like short stockings instead. I only needed about 8-10 and they did a great job. I would even say they were better, since they were bigger and less fiddly. I’ve even used paper towels to achieve this, so I’d like to think of myself as something of a hair McGuyver.
So I knew there had to be an easier way to make a rat. Easy as hell really. I simply cut the leg off a pair of torn fishnets, rolled it up, and tied an elastic around it to hold it together. That’s it. The length and thickness was perfect as-is. And because I used fishnets instead of regular stockings, the bobby pins easily have a place to go and it takes minimal pinning to keep it in place. If the ends poke out the sides of my bumper bangs, I do what Lisa Freemont Street instructs and pin up some hair on the side to cover it. A flower does a great job of this too. It’s an extremely adorable and quick style to do, especially if you want to have a pinup look but didn’t have the time or motivation to curl your hair.
Fishnets aren’t the only thing you can use for this. A rolled up bit of lace works too. Anything with holes in it like that is ideal for pinning. I’m sure there’s something in the room you’re sitting in right now that will do. No need to go to the store at all 🙂
I haven’t done a book review in a while, since I don’t usually read about fashion and style. So I thought it would be a good idea to write about “The 1950s Look” – even though I didn’t finish it.
I wanted to love this book, I really really did. I kept looking for other reviews about it to see if anyone else felt the same way about it I did, and was left with that feeling like someone just told a hilarious joke and you’re the only one who doesn’t get it. I hated this book. And once again, it was my arch-nemesis of literature, a great topic ruined by dry writing. And oh god was this ever a good topic, and oh god was the writing dry! In fact there was hardly any writing at all. More than half of it was magazine excerpts, which sounds great, but in reality just doesn’t work. I would have thought that reading old magazine articles would be fascinating, and apparently to most people it was. But it ended up coming across to me as just lazy. Zero of the author’s personality came through. And with the best of intentions, the work was much too detailed. I don’t care what fabric men preferred for their suits in 1954 vs. 1953. I just don’t.
So in an effort not to give up completely, I decided to plow through and at least try to find some interesting sections. To my disappointment, even the parts about some of my favorite topics, underwear, makeup, and hair, were boring as hell. I just couldn’t do it. Even now I’m tempted to try again because the topics are so great, but every time I did that I immediately gave up. Still, I guess I’m glad to have it on hand as a reference in case I ever need it.
I won’t tell you to avoid this book completely because it is full of interesting information, pretty pictures, and most people who read it absolutely loved it. But if you can manage to read a few pages before buying it, that would definitely be a good idea.
Since the hairstyles in the early 20th century were generally fairly short – about shoulder length or shorter – I’ve seen many requests online from women with long hair wondering how to recreate these styles without going for the chop. I can sympathize. I can’t remember where it was that I saw instructions for this style, probably Lisa Freemont Street, but I thought I would try to put it into my own words since trying it myself and seeing great results on the first try. I also want to spend a little time on it since I find it surprisingly versatile.
So here’s the look we’re going for. This is a Gibson Girl, the very first pinup. Personally it reminds me of those really old Edwardian Coke ads. It looks really hard to do. It’s not.
See? This was my FIRST try!
First you want to tightly curl all your hair. It’s up to you how to do this, either with pin curls or rollers. I just did my usual roller set. The beauty of this is that it doesn’t matter if the curls don’t turn out perfect. After you pile it all up there nobody can tell.
If you want to look really Edwardian, part your hair in the middle. You don’t have to, I parted mine deeply to the side the way I always do. Then grab 3 or more side combs. Chunk by chunk, fold your hair in half upwards so that the ends are sticking out from the top, and secure them with a comb. You can do a french twist sort of thing if you hair is shorter and/or you want to keep the sides really neat. But it doesn’t matter so much because you’ll be covering it up later. Don’t you just love styles that involve covering the mess of pins instead of making it perfect?
So keep doing this all around your head until all your hair is up except for some curls that you would like hanging out around your face. The piece in the back should be centered. Now this won’t look too good, so don’t get discouraged. It will be really messy and floppy. Take some bobby pins/kirby grips and pin those floppy curly ends up a bit higher. Leave the very top smooth for a look more like the Gibson girl, but you can just make yourself a big nest up there too if it suits you. that’s what I did. If you did an exceptionally good job this is where you might start to think this looks rather 1930s, in which case you’re free to stop there and enjoy 🙂
Otherwise, grab yourself a very long head scarf. Mine is just a big piece of black satin I cut. This can be either wide or narrow, but I like wide because it covers up more of the pins and odd bits, and you can always fold it later if you want it more narrow. Place it at the top of your head in a way that you like, likely with some curls from the back falling forward on top of it, and tie it at the bottom. You can leave these long ends to trail behind or over your shoulder, or wind them around your head and pin them. The second time I did this I pinned them with a peacock feather hair clip. It was very pretty if I do say so myself.
Now you take the pieces in the front that you left out, and if they’re quite long, pin them up higher with a bobby pin and tuck the remaining loop of hair under the scarf. More pieces looks older, less looks more modern.
Finally, you might want to do a little more arranging and pinning. If the back shows, try to get some curls to fall down over it and pin them in place. If you just can’t get it looking the way you want, go for it again. This is a quick one so it’s easy to get lots of practice.
You might find that with the scarf, this style moves back a little over time. In fact when I’ve done it I’ve seen that it likes to do its own thing, which somehow always ends up looking just as good if not better. As it’s very secure, it doesn’t fall out any more than a few tucks back under the scarf can’t fix. I was finding that mine ended up looking a little Greek, and oddly enough, modern at the same time. So here’s where you have the option of pinning it further back in the first place, and/or switching up the scarf for a couple narrow headbands, or nothing at all if the whole thing looks nice enough to show. You could even use a dread wrap if you want to keep it casual. I ended up with this.
My apologies for the terrible quality.
And accessory-free…
Looking very modern here.
So as you can see this is a great style to try out and play around with. I know I mentioned that this is great for long hair, but you can actually do this with ANY length that you can fit around a roller. More pinning for longer hair, less or even no pinning for shorter. There aren’t too many of those! Also, while this is technically an Edwardian style (the Gibson Girl picture is from 1912), I find it very conducive to the 20s as well. Just like wearing 40s hair with 50s clothes, wearing 10s hair with 20s and even 30s clothes looks just fine. I think I may have a new look for casual Friday in the works!
I know I’ve directed you to Lisa Freemont Street’s Youtube channel before, but I think she deserves some special attention here. As I start learning more about hair, Mike keeps suggesting that I make video tutorials to show people, but the thing is, almost everything I’ve learned I’ve learned from her, so they would just be mediocre copies of her amazing work. That, and I’m way too shy to be putting myself on video. Carefully selected stills only!
Lisa Freemont Street isn’t a trained stylist. She learned all this stuff on her own. It means she’s approaching this stuff the way we do and not as an expert, so she’s great at making things simple enough for even the most inept of us to understand. You’ll be amazed at what you can achieve by watching these. You could even make yourself look like a vintage cartoon character! Oh, and she also has a tutorial for what I know you’ve all been dying to know… how to make pin curls! I love this woman!
Hair isn’t the only thing she’s good at. She also has all kinds of makeup tutorials, product reviews, and mini guides to all things vintage. I’ve been watching her videos for days now, and I intend to watch them all. I may have some good information for you here, but trust me, it’s nothing compared to this. Go to the source and check her out.
I love sharing my little revelations with you guys, so since I finally got two basic curl sets figured out I thought I should write a tutorial. I’m going to show you a good basic 40s set, and a basic 50s set. The difference is that the 40s set has more volume on the bottom half and generally lies smooth over the crown, where the 50s set has more volume all over. Though they seem to be so similar you could easily interchange them and hardly anybody would know the difference. Depending on your hair, one could turn out looking like the other.
I’m going to show you the setting patterns for rollers since most of us are not quite skilled enough in the art of pin curls, but if you are they’re easily converted. You’ll have more and smaller curls but the directions will be the same. These are great beginner sets; they don’t involve a bunch of different layers going in opposite directions, and with practice they can easily be done in 10-15 minutes. For the sake of simplicity, I’ll be showing you my own hair after being set by the diagrams I’ve made (though I take no credit for designing them. Chances are a bazillion people before me have done the same ones). The celebrities hair have of course not been done using my diagrams, but it was probably set in a similar way and they do a better job of showing the difference between the decades, and an idealized look at how these should turn out. Now don’t forget your end papers and setting lotion! Ready?
Let’s start with the 40s set.
Front
Back
Veronica Lake, who’s hair is even longer than my own.
Gene Tierney, with a more traditional length.
This set is rolled only up to your ears, excepting the bang area which goes right up to the scalp, so the long curl will help frame your face. All curls will be going down, but you can tilt the ones in front towards your face if you like. You can do this in as many rows as you like, but for normal to fine hair and using rollers one can easily be enough. I prefer to have the curls done in an even row(s) all around the head, so that when you brush it out it creates nice uniform waves, but as every day 40s hair tends to be a little fluffier this isn’t so necessary. This is in fact an excellent set to try doing with pin curls.
You probably won’t need this.
When your hair is set, it might actually look pretty cute. If you come out with kinks in the top, you can use a flat iron or curling iron to smooth it out. Keep in mind that sponge rollers with their plastic clasps do tend to create kinks more than others, so I’m not partial to them. But you can use whatever you’re most comfortable with. I’m loyal to my pillow rollers, and when they’re not available I rag roll with whatever I can find. There’s a how-to video on this at the bottom of the article. Here’s the 40s set done with strips of paper towels. It needed to be brushed again, so don’t mind the ringlets and crazy flyaways.
And now here’s the 50s set.
Damn, I got that on the first try! I wish I could say the same for the second and third tries. We’re all learning together. You might find that this looks similar to the 40s set, however it’s rolled right up to the scalp which creates more volume all over. You can see the difference a lot better on shorter hair.
Elizabeth Taylor’s shorter hair demonstrates the volume starting right from the crown, as opposed to the more bottom-heavy look of the 40s.
Again, keep in mind that your hair cut affects the final look, so you might not have those face framing curls from the pictures. And if your hair is longer like mine, the weight might keep the crown looking smooth and 40s no matter what. That doesn’t mean it won’t look good, just go with what you have and make it yours.
My crappy drawing is a rough guide to how the curls should be positioned. Hopefully it’s not TOO crappy to understand.
As you can see, there are about 4 curls going down the center of the head; the front one going forward and the others going back. The second one can go towards what will be the thick side of your part, but I find it difficult for some reason and unnecessary. Then you’ll have two on each side going down.
The easiest way to go about this is to start with your hair parted deeply to whichever side you prefer, about over the arch of your eyebrow. Grab the section above your ear on the thin side and curl it down, or angled slightly forward if you like. Then grab a section of similar size behind it and curl it down as well, trying to get it to the same level. Then you can do the two curls on the top of your head, separated by another symmetrical parting over the other eyebrow. Curl the other side to match the first, and finally separate what’s left in the back into two curls going downward. Like before, if you have more hair or you’re using smaller rollers or pin curls, you’ll have more curls but they’ll still be going the same way. When you’re done you’ll look incredibly silly. Cover with a Rosie bandanna.
Make sure to brush this one out slowly and against your hand to keep it as smooth as possible, and shape the curls so they blend together. Hopefully you come out with a winner!
Like this!
I hope I explained these well enough. If you have any questions let me know. I’m going to finalize this by showing you a video that explains rag rolling quite well, since it’s incredibly useful if you don’t have any rollers handy and it’s something a lot of people have trouble with. It’s not half as hard as you might think. Good luck, guys!
Well, a modified middy. And I LOVE it. My hair was nearly to my waist, limp and shapeless, and I hadn’t had a hair cut in 6 months. It was taking me an hour to curl, and it felt like it took as long to comb. I felt buried. I was extremely close to hacking it off myself. So I made the appointment.
I had studied the middy a fair amount, and looked at a crap load of pictures. It’s a little hard to find pictures of it unstyled, but I landed on a good one, where the length of the layers were modified to be longer and less awkward so that the cut didn’t need to be curled to look right. I took this picture, a picture of the same girl with her hair styled, and a picture of Lauren Bacall, along with a mental list of instructions with me to Tonic.
Lauren Bacall, an awesome woman with awesome hair.
My stylist, Becky, didn’t know what a middy was, as far as I could tell. But she followed my instructions to the letter. Split ends gone, a U-shaped hemline, and lots of box layers with no texturing or feathering. My length rose to the bra line at the back up to just barely past my shoulders at the front. The result was a cut that looks very modern when left straight, elegant when softly curled, even surprisingly high class and professional, but that when set in curlers looks authentically forties or fifties. It’s a beautiful and very cool cut. Becky is awesome. I think I might even go shorter next time.
My hair as styled by Becky, and a horrible display of photographic skill.
In fact, the way she styled it, trying to imitate the picture of Lauren Bacall but using modern tools that didn’t quite do the job, was so sleek and elegant that I liked it even more than my own big fluffy “Hollywood” style of curling it.
My hair before, “Hollywood” style, before it has a chance to collapse under its own weight.
I wanted to recreate this, but punched up with a little more vintage. It didn’t take long to figure out how. My usual set was too curly, and just a curling iron wasn’t curly enough, and too time consuming. So I ended up doing 8-10 big curls instead of 15-20 little ones, radiating outward from the crown, with the thin side of the part smoothed out with the curling iron used like a flat iron. It took 10 minutes to curl instead of an hour, half an hour to dry instead of five hours, and barely a minute to smooth out. Perfect. As far as a perfectly vintage look, I finally got it down, and I love it enough to share. Tutorial to follow in the next article.
Perfect vintage hair, minutes before static and bad quality hair spray ruins it. I’m working on that too.
So if anybody in Winnipeg wants a stylist who will listen to them and give them a great do, go see Becky at Tonic!
Now, there is something that I failed to mention in my curling tutorial, and that’s about setting lotion. Setting lotion is a product that will make your hair fuller and keep the curl for longer. The most popular kind is Lottabody, and you dilute it in water. I’ve heard of different ratios, 1/5, 1/3, 1/2. You’ll have to figure out what works best for you based on your hair type. If it’s too thick it won’t spray out properly and your hair won’t curl. But the stuff does wonders. Alternatively you can use mousse or spray gel. Don’t use hair spray until AFTER you’ve finished styling though, or it will be too stiff to work with.
So there’s my little update. I’m learning a lot more about styling lately too so when I can get my thoughts on that in order I’ll be posting another. See you soon!
When you enjoy dressing vintage, you come to know a few things about what was in style in every decade, sometimes even each part of a decade. When you’re a person like this, you can make a reference to the 20s, get a response such as “oh, you mean Marilyn Monroe?” and not know whether to laugh or cry. In fact at a recent history inspired event someone said to me “I wasn’t sure if you were WWII or Titanic.” Putting aside the fact that either way it sounds like I looked like an epic disaster, if someone had been on the Titanic looking like I did it would have meant they got there in a time machine. Don’t get me wrong, she was a very sweet lady. But it’s common. I don’t expect the average person to be able to tell the difference between 1870s style and 1880s style, but we only just recently got out of the 20th century. It’s a very near part of our history, and its fashion has a major impact on what we wear today. How can you do 50s if you don’t really know what the 50s looked like?
Even if you don’t take style queues from the past, it can be extremely interesting to track its progress. And one thing I love doing is watching old movies and trying to guess their year or the year they were based on by the clothes they wore. I’m getting sort of good at it – I can usually guess within 3 years.
I was going to try explaining each decade typically considered part of the vintage era, but then realized there were way too many intricacies to do this properly. It would be too complicated and I would probably get it wrong somewhere along the way. In fact when I see a vintage outfit, I don’t find myself mentally deconstructing it in order to tell what decade it’s from, it’s simply recognizable. So here is a compilation of pictures, to help you become more familiar with the look of each decade and what makes it unique.
I’m really into vintage and pinup style, but that includes more than just the clothes. So today I’m going to take a break from fashion to talk about vintage nails and the basics of how to achieve them.
I’ve had pointy nails since I was 17. It all started when I got a crack down one side of my thumb nail, so I clipped off that side so the crack wouldn’t spread, and then evened out the other side by doing the same. This resulted in a hell of a point, and I actually liked it enough to start doing it on all my nails.
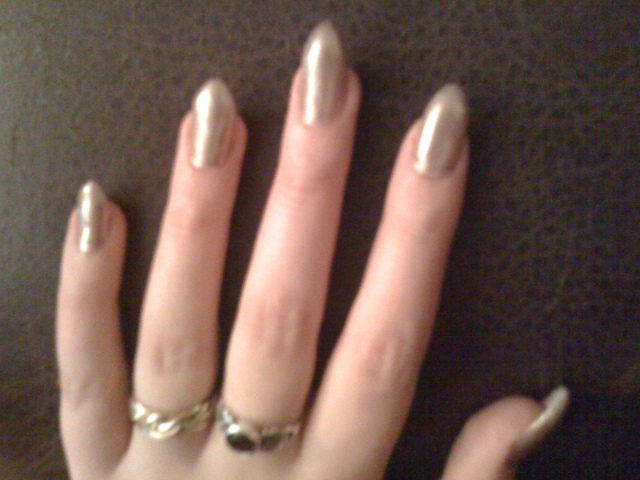
These days it’s a little different. My nails vary in length depending on my mood and are a bit rounded at the sides to soften the look. I’ve also been getting gel nails for some time now, because they’re way too soft to hold up on their own. Some of the girls at the salon love doing my nails because my unusual shape is a change of pace, and a challenge. Though these days I file them myself because I’m very particular and there just isn’t enough time to get them just right when they have other appointments to get to. The first time I got them done everyone wanted to see, since I was the first girl they’d ever met to actually get them done that way since they were taught how in beauty school. IMHO, my nails look fabulous. I seriously prefer them to modern squared off nails, which Mike and I refer to as “porn nails”, since we’ve noticed every porn star with them. Don’t bother asking how we’ve noticed that.
Phones take shitty ass pictures.
The shape is also great for accentuating long fingers, as opposed to the squares that can make them look stumpy.
A very long time ago, I remember watching old Disney movies like Sleeping Beauty and noticing that the women’s nails were all very tapered and even pointy. I guess I just thought it was an animation thing done to make their fingers appear longer and more elegant, but then the other night I was going through a vintage message board when I saw a post about nails. I got to see advertisements and makeup guides from the 1930s, and to my surprise, the women had tapered and pointed nails! I even read that for a short period black nail polish was in style, so it seems to me that vintage nails are gothic nails, and I’ve had vintage nails (minus the black polish) without even knowing it for the last seven years. Very cool.
How do you do a pointed or tapered nail shape? First thing, be aware that this is a shape that will weaken the nail, so unless they’re naturally rock hard, you should either keep them to a short-medium length (which to me is much longer than modern styles anyway), or get them done with gel. You will need a certain amount of length to get them to form a proper point, so have them a bit grown out first if you’re not getting the gel.
To make a deadly sharp point is pretty easy. Just file towards the middle of the nail, switching sides often to make sure that the point ends up right in the middle. When a girl at the salon rushes too much on my nails I often end up with them pointed to one side or the other and then I have to fix it, so it’s important to watch out for this.
To keep it more subtle and authentic like I do, the general shape is the same but will become altogether more rounded. The tip won’t be sharp, and the sides curve towards the middle. Push the file into a curve as you push it towards the tip of the nail instead of heading straight towards it. This method discourages filing your nails in a “see-saw” way, which is really bad for weakening your nails anyway.
If you want vintage color, the standard reds and pinks were in style, but also blue, green, silver, and lots of other colors according to what dress was worn. I would suggest that if you have longer and sharper nails you balance it out by using a more subtle color, lest you risk looking like a witch on Halloween. Usually the whole nail wouldn’t be painted; the lunula (white part near the cuticle) was left unpainted or painted white, as well as the tip, almost like a French manicure. Later on, the tip was painted. To paint your nails leaving the lunula, sticking one of those circular little hole re-enforcers for loose leaf just past the cuticle works well. If you want to have that part white or another pale color, do the whole nail that color first, and then once it’s dry go over it again in your second color using the re-enforcer.
You can of course put your own spin on all this. I’d love to see pics of your nails in the comments!
Update: I went and got my nails redone a couple weeks ago after a long hiatus of being first broke and then lazy. I was told that I was ahead of my time (I had thought I was way behind?) and since I stopped going they became super trendy, by way of Lady Gaga, Rihanna and the like. But now they’re all blingy and neon and weird. A little tacky to me, but it looks like this trend in its original 1930s form will be coming back as a great way to do this in a more mild and every day way. I wonder how many girls following this trend know how long ago it actually started. There is nothing new under the sun.
Pinup Girl Clothing specializes in a slightly edgier version of clothing styles from the 1950s and early 1960s, but they are so much more than just pretty dresses, separates, shoes, and accessories. They absolutely epitomize the idea of not just selling you an item, but an entire lifestyle to go with it. This is largely due in part to the accessibility of its owners and models, and the community of customers that was built round it on facebook.
First, let’s talk about the clothes, shall we? What gorgeous clothes they are! You obviously know by now how much I love classy, sexy vintage-inspired clothing, and this site delivers, but they have something a little different. With one of their house brands Deadly Dames, you can get clothes with an edgier more modern feel, perfect for punky yet sweet rockabilly girls. This is just what these clothes need to stand out from all the other vintage-inspired clothing being sold out there today. They even sell monster shoes, super high heels with zombie and werewolf prints. Even while different they retain the ability to be incredibly flattering on absolutely any body type. Going beyond rockabilly, another of their house brands Pinup Couture has a sweet more classic feel, and Dixiefried effortlessly recreates the look of the stars from the golden era. There’s never been an easier way to have fun with your look.
PUG as they’re known are also very unique for the models they use. One of their models, Micheline Pitt, is also the designer for Deadly Dames, and a makeup artist among other things. Another one of their models, Masuimi Max is an accomplished fetish and pinup model and tightlacer. Many of their models have tattoos, and most importantly, they’re all different sizes. The absolutely stunning Doris Mayday (my personal favorite) is envied by tons of girls for her sexy curves, and amazing burlesque performer and PUG model La Cholita remains a prominent feature despite being plus-sized. For good measure they still have slim girls, and variety is the point. PUG is extremely in tune with what their customers want, and one thing that is often lacking from other clothing companies is being able to see what an outfit would look like on YOUR body type. Beyond anything else, this company shows you that gorgeous has no size.
If you become a fan on facebook, you’ll become a member of a community of girls who love pinup style. The boards are always active with topics such as how to achieve the perfect vintage look including what underwear the models have on under certain outfits, what size to buy and how to launder the items, and even items for swap and sell. You can browse through hundreds of customer photos and post your own in the hopes of getting a comment from one of the amazing women behind the company, and they’re always giving hair and makeup advice, and sharing the latest coupon codes.
PUG doesn’t just try sell you a lifestyle to make you buy their clothes, they deliver. And this is one of the reasons why I’m so devoted to this store and its brands. These are beautiful people inside and out, and with these clothes you’ll feel extremely beautiful too. Pinup Girl Clothing offers the whole package.
So you’ve got the middy haircut and set your hair in curlers. Now what? First of all let me tell you that I am not a hairstylist, nor am I even good at hair, so I can’t tell you how to perfectly do every vintage style. I can however give you a few basics that will more than get you started, and I promise that if I come across any new information you’ll be hearing about it.
When you first take your hair out of the curlers it’s important to be really gentle. Don’t pull on them and don’t do anything to get them tangled, because curly hair is harder to comb than straight hair and if you’re not quite used to it it can be a frustrating pain in the ass you don’t want to deal with. And tangles are not hot. The best way I’ve found is to hold the curler vertically and gently unwind it rather than just unrolling it the same way you rolled it up, because that can twist your curls all sorts of weird directions and then you won’t end up with a uniform look in the end. If your set was a success you should come out of this looking like Shirley Temple. Now of course you’re not four years old, but don’t worry because it won’t stay like this. If a few of the curls didn’t properly set for whatever reason and are now hanging loosely past the others, take a bobby pin after you’re done brushing and pin the piece under so the ends fall to the same place as the rest of your hair, and nobody will ever know.
You’re going to want to be very careful brushing the curls out, or like I said, you’ll get some terrible tangles. Brush a curl or two at a time and then separate them all with your fingers. Don’t panic and head back to the shower if you get a lot of poof at first, especially if you did pin curls. This is normal and should go down if you just keep brushing it. If that fails, spritz some smoothing lotion over it and that should do the trick.
Now you can leave it like this, or clip in a pretty flower. This is the simplest way but what else? I bet you’re dying to learn how to do victory rolls, right? Well seeing as how rolls are in my opinion the most important thing to know when learning to style vintage hair if you’re not just going to leave it down, I’m going to teach you now.
Just like pin curls, rolls are easy to explain but hard to do. I have yet to master them. The very easiest way is to use what’s called a rat. These are just like big curlers made of sponge that you roll your hair around and pin in place. You can buy them at a beauty supply store, or you can buy them here at amazon since I’ve had a really hard time finding them in person. Some of them actually have ends that snap together so you can do perfect buns and other things. If you don’t want to buy a rat, another option is to make one yourself. In the Victorian era they had porcelain hair keepers where they would collect the hair from their brushes for making rats. You can do this, but I understand if you think that’s gross. In that case go to the ethnic section of your beauty supply store and buy a 3$ bag of extension hair. This will most likely be called Kenekalon jumbo braid and come in a giant braid of all the basic natural hair colors. It will be more than enough.
Then get yourself a few sturdy hairnets or cut the feet off some old stockings that closely match your hair color. Put the hair in a hairnet or stocking foot until it’s about the size you want it and tie it up. While we’re at it, this is also a really great alternative to Bumpits, and if you make them big enough you can even create big beehives or those fabulously flamboyant 18th century hairstyles. Shwing!
Did you feel like that was cheating or something? Worried it will show? You can try rolls without a rat, if you’re willing to spend a lot of time practicing in front of the mirror. First, you’ll need to backcomb a lot so your hair “sticks” together and won’t separate in the roll. Curl the ends under, and while never letting go of the ends continue to roll it up to your head and pin into place with bobby pins. Do one roll on either side of the top of your head for perfect victory rolls. And speaking of victory rolls, if you just don’t have the time you can fake the look by twisting the sections of hair and securing them with a side comb pushed forward. You probably remember that from Vintage Hair Part 1. It’s not the same, but it will definitely get you by. For the back you can either do another roll facing upwards, narrow or wide, for a casual updo or just toss it into a snood, which is really just a pretty hair net. These date back to the renaissance, experienced a resurgence in the civil war period, and returned in the 40s because they were great for the women working in factories who needed to keep their hair out of their face. And I promise you won’t look like a fast food worker wearing one; they really can be quite attractive.
Rolls aren’t only great for 40s styles. Have you ever wanted those cute bettie bangs? A lot of people fake it by just doing a forward roll in the front of their hair, and it looks great, as seen here on pinup model Bernie Dexter. For the most authentic 50s shape make sure the roll forms in a U shape, longer in the middle and going up at the sides. You can of course use a rat to achieve this too.
Go ahead and have fun with this. In the meantime I’ll once again send you off to watch Lisa Freemont Street’s videos, and go on a hunt for more pictures, articles, and information to share with you. And send me pictures of your hair if you try any of this!